Seminole Strip of the Month
This page is devoted to our 2022 Seminole Strip of the MonthWelcome to SSOM 2022!
These strips are fast and fun to do, and can look dramatically different depending on your fabric choices, as demonstrated by my two samples below.
Finished size will be a moveable feast because you will have quite a lot of flexibility: making it longer by adding horizontal sashings, and wider by adding borders. Each of the pattern strips is 42 inches wide finished, so will be perfect for a small bed. But you could make two of each strip for an 84 inch centre to a large bed quilt. I also think that any of these strips could be adapted to use as a border for medallion style quilts.
Finally, you really don’t need to use only five fabrics (in fact I ran out of some halfway through, and brought in substitutes). You can approach every strip as a new pattern and use up some of your stash. The chart below shows fabric used on version 1, but please feel free to choose your own colours .
Have Fun!
Sarah Quilter
Fabric Requirements for SSOM22 

- All measurements are in inches.
- Unless otherwise indicated, all lengths are based on full width of fabric (WOF), measuring around 43 inches. I had one that was only 40 inches wide, and it was a pain!
- Requirements for strip 5 varies depending on whether you choose to have floating crosses or an on-point nine patch effect. This also affects the totals for each fabric.
- You will also need nine strips of fabric for “sashing” between the rows. I made them very thin (1 inch, which is 0.5 finished), but you can adjust this width (or add more horizontal strips) to make the quilt longer. It is your decision.

Floating Point Version

Nine Point Version
Monthly Seminole Strips
This section will be updated as each strip is released. Optionally, you may download the monthly strip as a PDF file.
SSOM - Strip 1
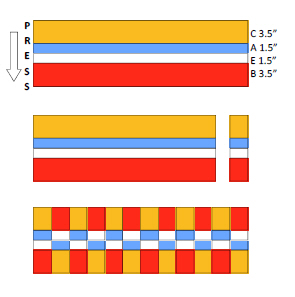
Strip # 1 - Make a 42 inch wide strip as follows:
Fabric requirements:
- Fabric A: Two* strips 1.5 inches wide
- Fabric B: Two* strips 3.5 inches wide
- Fabric C: Two* strips 3.5 inches wide
- Fabric E: Two* strips 1.5 inches wide
*In each fabric, you will only need about 14” of the second strip.
Stitch together into base strip blocks as shown.
Press all seams in the same direction.
Cut into 2.75 inch slices.
You will need 18 or 19 to make a 42” final strip, depending on your seam allowance.
Sew back together, flipping every second slice.
This is our February block. Experience tells me that some of you will have yours finished by the February meeting, but you have the whole month before our show-and-tell at the March meeting.
I doubt you’ll have any problems, but you can contact me at sarah_quilter@hotmail.com, or call on 0422 801 789.
Have fun!
Sarah Quilter
Tips: A very straight-forward construction, this is good practice for seam nesting. I would suggest that, despite it being tiresome, pinning really helps you get a nice sharp line.
SSOM - Strip 2
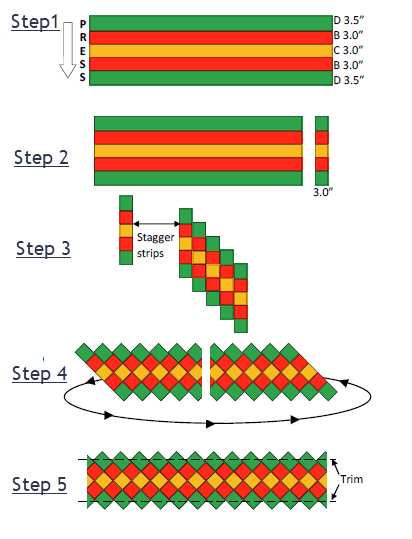
Strip # 2 - Make a 42 inch wide strip as follows
Fabric requirements - all strips are width of fabric:
- Fabric B: Two strips, 3 inches wide
- Fabric C: One strip, 3 inches wide
- Fabric D: Two strips, 3.5 inches wide
TIPS:
- As with Strip 1, flipping every second strip makes seams nest nicely, and pinning really helps.
- Think about seam allowances when trimming the peaks in the final step
Step 1: Stitch together into base strip blocks as shown. Press all seams in the same direction.
Step 2: Cut into 3 inch slices.
You will need twelve or thirteen to make a 42” final strip, depending on your seam allowance.
Step 3: Sew back together, flipping every second slice, and staggering the strips so they form a staircase shape.
Step 4: Cut vertically through the new strip, and join the two slanting ends to create your final strip.
Step 5: Trim the top and bottom peaks, making sure to leave enough seam allowance so you don’t cut off the top of the inner diamonds when you sew the finished strips into a quilt.
This is our March block. We will have a show-and-tell at the April meeting. If you have any questions or problems please contact me at sarah_quilter@hotmail.com, or call on 0422 801 789.
Have fun! Sarah Quilter
SSOM - Strip 3
Download the SSOM #3 for the full instructions.
SSOM - Strip 4
Download SSOM #4 for the full instructions.
SSOM - Strip 5
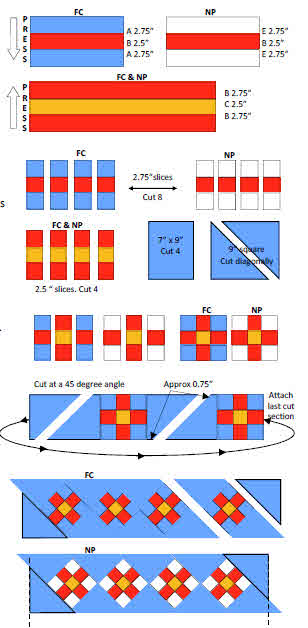
Download the SSOM #5 for the full instructions.
SSOM - Strip 6
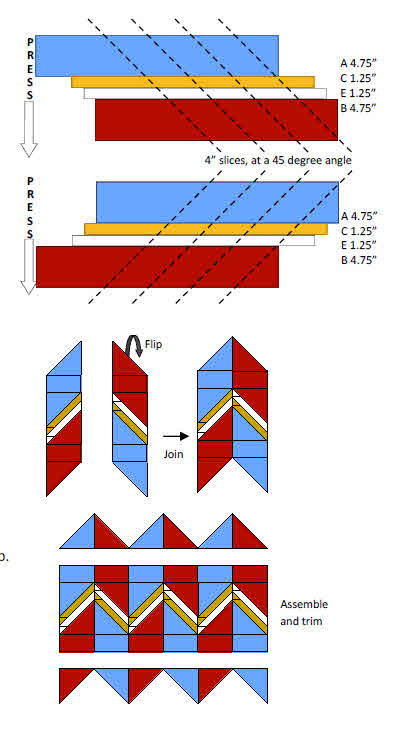
Download the SSOM #6 for the full instructions.
SSOM - Strip 7
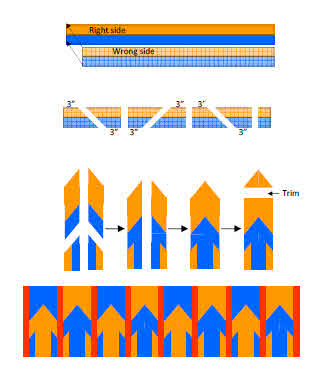
Download the SSOM #7 for the complete instructions.
SSOM - Strip 8
Finishing: This is it. The last block!
Trim: Trim all your strips to 42” wide. I usually folded the strips in half, then measured 21” from the fold, and cut. However, if a strip needs a little extra you can add a piece of sashing or a leftover motif from another pattern - you are only limited by your imagination.
Join: To construct you can add sashing between the strips. I used 1 inch sashing because I didn’t want to add any length. This way, it should measure 42” wide, and between 62” and 65” long (depending on your trimming decisions).
If you have been making wider strips for a larger quilt, you may want to use deeper sashing to add length. Or you can join several strips of varying widths and colours to form a multicoloured sashing effect.
Borders: Whether to add borders is up to you and how you want to use the quilt. I added a wider side border on one of my samples to even up the length:width ratio.
Quilt and enjoy!
I do hope you’ve had fun making this project. And do give me a call if you have questions.
Sarah Quilter 0422 801 789 sarah_quilter@hotmail.com
Download SSOM #8 for the complete instructions.